Saturday, 12 September 2015

Epson introduces RIPS technology to reduce print costs

 Epson introduces RIPS technology to reduce print costs


Epson has introduced its Replaceable Ink Pack Systems (RIPS) printers which claims to drastically reduce costs. The Epson WorkForce Pro RIPS series utilize high capacity Replaceable Ink Pack Systems (RIPS) that can hold a far higher volume of ink compared to traditional ink cartridges.
The system provides the ease-of-use of a cartridge-based system, combined with the high volume printing of an ink tank system. The Workforce RIPS printers can provide enough ink to print up to 75,000 A4 pages of Black and Colour. “Workforce RIPS printers offer the lowest print cost in this category of 30 Paise for B&W and 75 Paise for Colour, and an amazingly low energy consumption of just 40Watts,” according to a statement.
Epson claims this new system gives business owners and corporates the freedom to print without worrying about the cost or physical waste. The company also announced its entry into the copier segment with the launch of the Epson WorkForce Pro WF-R8591 and WF- R5691. While the WF-R8591 is priced at Rs193,999 (Desktop Model) and Rs 262,996 (Pedestal Model) respectively, the WF-R5691 is priced at Rs 98,999.
- See more at: http://computer.financialexpress.com/news/epson-introduces-rips-technology-to-reduce-print-costs/13632/#sthash.NZuha8xL.dpuf
 Epson has introduced its Replaceable Ink Pack Systems (RIPS) printers which claims to drastically reduce costs. The Epson WorkForce Pro RIPS series utilize high capacity Replaceable Ink Pack Systems (RIPS) that can hold a far higher volume of ink compared to traditional ink cartridges.

The system provides the ease-of-use of a cartridge-based system, combined with the high volume printing of an ink tank system. The Workforce RIPS printers can provide enough ink to print up to 75,000 A4 pages of Black and Colour. “Workforce RIPS printers offer the lowest print cost in this category of 30 Paise for B&W and 75 Paise for Colour, and an amazingly low energy consumption of just 40Watts,” according to a statement.

Epson claims this new system gives business owners and corporates the freedom to print without worrying about the cost or physical waste. The company also announced its entry into the copier segment with the launch of the Epson WorkForce Pro WF-R8591 and WF- R5691. While the WF-R8591 is priced at Rs193,999 (Desktop Model) and Rs 262,996 (Pedestal Model) respectively, the WF-R5691 is priced at Rs 98,999.

Epson has introduced its Replaceable Ink Pack Systems (RIPS) printers which claims to drastically reduce costs. The Epson WorkForce Pro RIPS series utilize high capacity Replaceable Ink Pack Systems (RIPS) that can hold a far higher volume of ink compared to traditional ink cartridges.
The system provides the ease-of-use of a cartridge-based system, combined with the high volume printing of an ink tank system. The Workforce RIPS printers can provide enough ink to print up to 75,000 A4 pages of Black and Colour. “Workforce RIPS printers offer the lowest print cost in this category of 30 Paise for B&W and 75 Paise for Colour, and an amazingly low energy consumption of just 40Watts,” according to a statement.
Epson claims this new system gives business owners and corporates the freedom to print without worrying about the cost or physical waste. The company also announced its entry into the copier segment with the launch of the Epson WorkForce Pro WF-R8591 and WF- R5691. While the WF-R8591 is priced at Rs193,999 (Desktop Model) and Rs 262,996 (Pedestal Model) respectively, the WF-R5691 is priced at Rs 98,999.
- See more at: http://computer.financialexpress.com/news/epson-introduces-rips-technology-to-reduce-print-costs/13632/#sthash.NZuha8xL.dpuf

Epson introduces RIPS technology to reduce print costs

- See more at: http://computer.financialexpress.com/news/epson-introduces-rips-technology-to-reduce-print-costs/13632/#sthash.NZuha8xL.dpuf

Epson introduces RIPS technology to reduce print costs

- See more at: http://computer.financialexpress.com/news/epson-introduces-rips-technology-to-reduce-print-costs/13632/#sthash.NZuha8xL.dpuf

Noctua NH-D9L

Not only is the segment getting popular, but it has also seen an increase in the variety of components available to quench the thirst for performance. All of this increase in demand for small form factor PC’s can be attested by the fact that small form factor components are quite big on performance these days. When you can build a powerful PC that’s almost half the size of regular ones and hide it anywhere, it surely becomes an interestingly viable option.

Over the course of time, we’ve tested plenty of coolers from both – the air and liquid cooling categories and coolers from Noctua have always stood out for their quality, performance and extreme silence. In fact, the Noctua NH-D15 is the best performing CPU air cooler that we’ve ever tested and it won our best performer award in the segment not too long ago. While the NH-D15 is a full-size air cooler with a huge heatsink, this time around, Noctua sent us their NH-D9L for review which belongs to their small form-factor range of CPU coolers. And so, according to Noctua, the NH-D9L is being marketed towards people building a silent small form-factor PC as it has a humble 95x95mm width and depth. So, let’s put Noctua’s new kid on the block to test and see how it fairs.
Testing and Performance Results

As we mentioned previously, we have a standard set of components that we use for testing the CPU coolers and they remain the same for testing air as well as liquid coolers. This makes easy for you to understand and gauge the performance difference between all the coolers that we test and then take a pick depending on your usage scenario. This also ensures a level playing field between all the coolers and prevents any cooler from getting an unfair advantage over the others. Also, we make use of a digital temperature monitor to keep the ambient room temperature in check in order to make for any corrections if there is any deviation from an ambient room temperature of 28°C.

Test Components
CPU: Intel Core i7 3770K;
Motherboard: ASRock Z77 Extreme 6;
RAM: Kingston HyperX 16GB (4GB x4 sticks) 1600MHz;
Storage: Intel X25-V 40GB SSD;
Power Supply: Antec VP650P;
Cabinet: Cooler Master HAF-XM;
Operating System: Windows 8

As for the testing software, we use Real Temp and HWMonitor to keep the idle and load CPU core temperatures in check and run Prime95 for stress testing the system and note down the readings. To take a note of the idle operating temperature, we first let the system run for at least 45 minutes to an hour in order to wait for the temperature to stabilize and then measure readings.

You must know that since the Noctua NH-D9L comes with only one fan, but supports installation of two fans, we also tested the cooler in a dual-fan based setup for posterity. So let’s take a look at how it fares against Noctua’s own NH-U9S which is a similar 92MM cooler. We’ve also shown results of two of our other favourite coolers (albeit full size ones) - the Cooler Master Hyper 212X and the Noctua NH-D15 so that you can see the difference between all of them.


Conclusion

The current CPU cooler market is over saturated with a huge number of coolers available in plenty of different price segments but when it comes to coolers that are primed for small form-factor builds using Mini-ITX and Micro-ATX boards, there aren’t many good choices available. After all, a cooler for small builds has to have certain dimensions that make it not only fit a small PC case but also allow for enough room around it for other components. And trust us when we say this that we’ve experienced an insane number of CPU air coolers that didn’t provide for any sort of RAM and PCIe clearance. So much so that we had to sacrifice one or more RAM slots that are immediately adjacent to the CPU socket owing to the big-ass size of extravagant heatsinks. But the Noctua NH-D9L doesn’t give any of this unnecessary trouble.


Not only is the segment getting popular, but it has also seen an increase in the variety of components available to quench the thirst for performance. All of this increase in demand for small form factor PC’s can be attested by the fact that small form factor components are quite big on performance these days. When you can build a powerful PC that’s almost half the size of regular ones and hide it anywhere, it surely becomes an interestingly viable option.
Over the course of time, we’ve tested plenty of coolers from both – the air and liquid cooling categories and coolers from Noctua have always stood out for their quality, performance and extreme silence. In fact, the Noctua NH-D15 is the best performing CPU air cooler that we’ve ever tested and it won our best performer award in the segment not too long ago. While the NH-D15 is a full-size air cooler with a huge heatsink, this time around, Noctua sent us their NH-D9L for review which belongs to their small form-factor range of CPU coolers. And so, according to Noctua, the NH-D9L is being marketed towards people building a silent small form-factor PC as it has a humble 95x95mm width and depth. So, let’s put Noctua’s new kid on the block to test and see how it fairs.
- See more at: http://www.digit.in/pc-components/noctua-nh-d9l-review-5926.html#sthash.2Xu5hI6K.dpuf
Not only is the segment getting popular, but it has also seen an increase in the variety of components available to quench the thirst for performance. All of this increase in demand for small form factor PC’s can be attested by the fact that small form factor components are quite big on performance these days. When you can build a powerful PC that’s almost half the size of regular ones and hide it anywhere, it surely becomes an interestingly viable option.
Over the course of time, we’ve tested plenty of coolers from both – the air and liquid cooling categories and coolers from Noctua have always stood out for their quality, performance and extreme silence. In fact, the Noctua NH-D15 is the best performing CPU air cooler that we’ve ever tested and it won our best performer award in the segment not too long ago. While the NH-D15 is a full-size air cooler with a huge heatsink, this time around, Noctua sent us their NH-D9L for review which belongs to their small form-factor range of CPU coolers. And so, according to Noctua, the NH-D9L is being marketed towards people building a silent small form-factor PC as it has a humble 95x95mm width and depth. So, let’s put Noctua’s new kid on the block to test and see how it fairs.
- See more at: http://www.digit.in/pc-components/noctua-nh-d9l-review-5926.html#sthash.2Xu5hI6K.dpuf
Not only is the segment getting popular, but it has also seen an increase in the variety of components available to quench the thirst for performance. All of this increase in demand for small form factor PC’s can be attested by the fact that small form factor components are quite big on performance these days. When you can build a powerful PC that’s almost half the size of regular ones and hide it anywhere, it surely becomes an interestingly viable option.
Over the course of time, we’ve tested plenty of coolers from both – the air and liquid cooling categories and coolers from Noctua have always stood out for their quality, performance and extreme silence. In fact, the Noctua NH-D15 is the best performing CPU air cooler that we’ve ever tested and it won our best performer award in the segment not too long ago. While the NH-D15 is a full-size air cooler with a huge heatsink, this time around, Noctua sent us their NH-D9L for review which belongs to their small form-factor range of CPU coolers. And so, according to Noctua, the NH-D9L is being marketed towards people building a silent small form-factor PC as it has a humble 95x95mm width and depth. So, let’s put Noctua’s new kid on the block to test and see how it fairs.
- See more at: http://www.digit.in/pc-components/noctua-nh-d9l-review-5926.html#sthash.2Xu5hI6K.dpuf

Sunday, 2 August 2015

How to Make a Bootable USB Disk for Windows 10

Now that Windows 10 is available for download, many of you might be planning to install Microsoft's new desktop operating system on your computer. There are plenty of reasons to install Windows, and different editions to choose from. You can automatically upgrade to Windows 10 or you can make a bootable disk to install Windows 10 on one or more computers in a hurry.
You can choose to make a Windows 10 bootable USB disk or DVD, though the USB offers some advantages like faster read/ write speeds. You are also likely to have a USB drive lying around, or your computer may not have a DVD drive, in which case the decision is already made for you.
(Also see: How to Make a Bootable USB Disk for Windows 8, Windows 7, Windows XP)
Make sure that the USB or DVD (if rewritable) you pick to be your Windows 10 bootable media has no important data on it, because this process will format the drive, which means you will lose everything on it. Also make sure that the drive is of minimum 4GB capacity, as the process requires 3GB of space. With that in mind, here's is the list of steps you need to follow to make a bootable Windows 10 drive:
1) Download Windows 10 media creation tool. Here are links to download the Windows 10 media creation tool for 32-bit (x86) and 64-bit(x64) Windows respectively. To find out which type of Windows you are running, go to Start, type Control panel, select System and security, and then, under System, look at the value for System type, or check this step by step guide by Microsoft.
(Also see: How can I tell if my computer is running a 32-bit or a 64-bit version of Windows?)
2) Once Media creation tool is installed, launch the application. When asked What do you want to do? select Create installation media for another PC, and click Next.

windows_10_usb_create_media_ndtv.jpg3) On the next screen, select your preferred Language and Architecture as determined in Step 1. Also choose Edition as explained below and click Next.
windows_10_usb_select_language_ndtv.jpgIf you are currently running Windows 7 Starter, Windows 7 Home Basic, Windows 7 Home Premium, Windows 8, Windows 8.1, Windows 8.1 with Bing, or Windows 10 Home, choose Windows 10 Home as Edition.
If you are currently running Windows 7 Professional, Windows 7 Ultimate, Windows 8 Pro, Windows 8.1 Pro, Windows 8 Professional, Windows 8.1 Professional with Media Centre, or Windows 10 Pro, choose Windows 10 Pro as Edition.
If you are currently running Windows 8 Single Language, Windows 8.1 Single Language, or Windows 8 Single Language with Bing, choose Windows 10 Home Single Language as Edition.
If you are currently running Windows 8 Chinese Language Edition, Windows 8.1 Chinese Language Edition, or Windows 8 Chinese Language Edition with Bing, choose Windows 10 Home China as Edition.
4) If you are creating a bootable Windows 10 USB disk, select USB flash drive and click Next to follow the rest of the steps. A reminder once again you will lose whatever data is there in the drive you select.
windows_10_usb_select_media_ndtv.png
If you want to create a bootable Windows 10 USB DVD, select ISO file. Make sure you have ISO file of the Windows 10 version you selected in step 3 handy. ISO files are basically images of the setup files, and the Windows 10 ISO files are available from Microsoft
Once Windows 10 media creation tool has finished doing its job, you should have a Windows 10 bootable USB disk/ DVD drive, depending upon the option you chose.
If you have problems with any of the above steps, you try using the Windows USB/ DVD Tool, which was designed for Windows 7, but handles Windows 10 just fine. You can use this guide in case you need any assistance with that, just use Windows 10 ISO files instead.

Thursday, 23 July 2015


Configuring Windows Deployment Services over a LAN

               Windows Deployment Services is the updated and redesigned version of Remote Installation Services (RIS). It enables you to deploy Windows operating systems over the network
                You need to have Windows Server 2008 or Windows Server 2003 SP2 to deploy the WDS server. Also, make sure your Active Directory and DNS are up and running. DHCP server should be authorized by Active Directory on your network. Linux DHCP servers do not need to be authorized by AD. On the client side you need NICs to be PXE compliant (almost all network adapters that are available for several years now are PXE compliant).
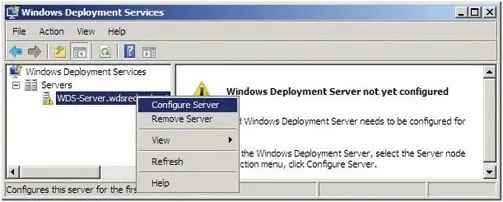
Step1: First install WDS service. For this Go to roles and add this service. Next click Start, then Administrative Tools, and then click on Windows Deployment Services .
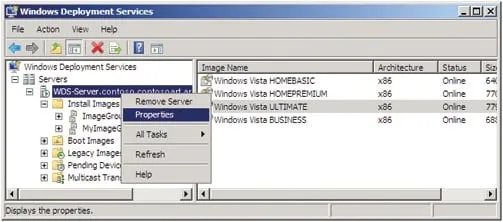
Step 2: Right-click the server, and then click on Configure Server and follow the instructions.
step2
Step3: When the configuration is completed the yellow mark on server is cleared. Now that you have configured the server, you will need to add images. Here you have to give at least two images: one boot image and the other for installation before you are able to boot WDS Server services .

step3
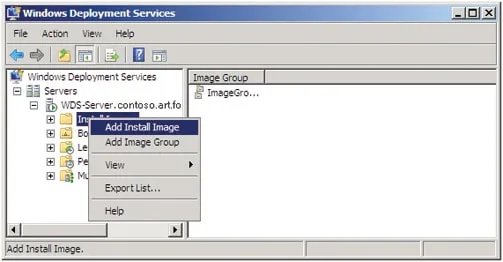
Step 4: To add the Install image
In the Windows Deployment Services MMC snap-in, right-click on the Install Images node, and then click Add Install Image.
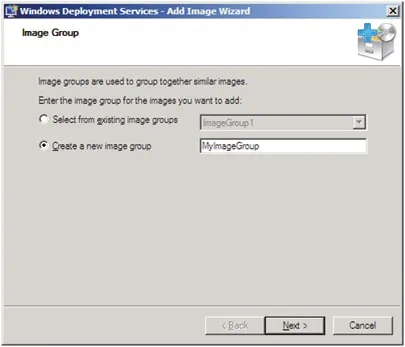
1.    Specify a name for the image group, and then click Next.

step4
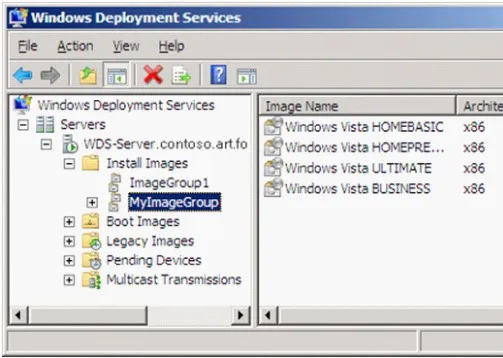
2.    Browse to select the default install image (Install.wim), which is located in the \Sources folder of the product DVD, and then click Open. Repeat this procedure to add any additional install images.

step4b
Step 5: To add boot image
1.    Browse to choose the default boot image (Boot.wim) on the product DVD which is located in the \Sources folder. Click Open and then click Next.
step5a
2.    After the above process completes, right click on the image you just added and select “Create Capture Boot Image”.
3.    If you want to change any server configuration right click on server and click on properties.
step5b

Step 6: To install an operating system on client side
step5c
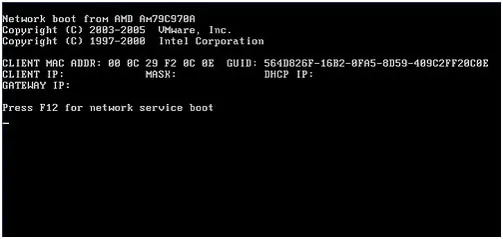
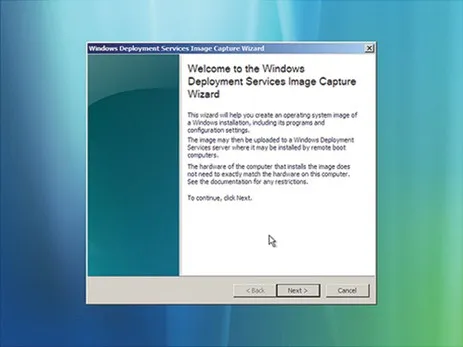
Go to BIOS of the client computer and enable PXE booting and set the boot order network first. Restart your computer and press F12 to boot and select network boot. Follow the instructions.Once it boots, it will show the Windows Deployment Service wizard from where you can easily install the boot image.

step5d

Monday, 6 July 2015


How to install X2Goserver on Ubuntu 14.04


           X2Go server enables access to the graphical desktop of a computer remotely, even over a low bandwidth connection
X2Go is a Remote Desktop solution which allows you to remotely connect to a PC. It supports all the OS whether it is Linux, Windows or Mac OS X. A key feature is that it even supports sound transmission over remote connections. Multiple users/clients can access a single X2Go Server at the same time, with each user/client having an individual Desktop session. In this case, we are using Ubuntu (server & client) and Windows 7 (client).
X2Go server Installation
Step 1: Install  X2Go server on Ubuntu 14.04 Server.
apt-get update
apt-get install python-software-properties
add-apt-repository ppa:x2go/stable
Step 2: Add PPA repository of x2Go to install x2Go server and client via repository.
sudo apt-add-repository ppa:x2go/stable
sudo apt-get update
sudo apt-get install x2goserver x2goserver-xsession
sudo apt-get install x2golxdebindings  # if you use LXDE/lubuntu
Step 3: Now, install the graphical Desktop environment in the Ubuntu Server. Run the following command and reboot.
apt-get install xfce4
reboot
X2Go connection with Ubuntu Desktop
Step 1: Now, connect the Ubuntu 14.04 server with the X2Go client from Ubuntu 14.04 desktop. Install the X2Go client in the Ubuntu Desktop as follows:
sudo add-apt-repository ppa:x2go/stable
sudo apt-get update
sudo apt-get install x2goclient
 
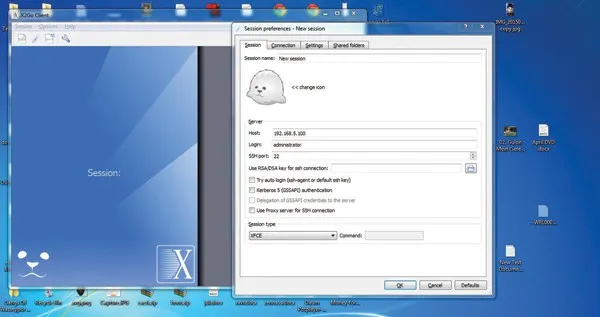
Step 2: After successful installation of the client, open the X2Go client in the desktop and give the following details:
Session name: New session (any name)
Host : 192.168.5.100 (Your IP)
Login : administrator (or any user on your Ubuntu Server)
SSH port : 22 ( if not altered at Ubuntu Server)
Session type : XFCE ( Graphical environment installed
in server)
Step 4: Now, it will ask for user credentials. In this case, it is user=administrator and password=pcquest. After putting credentials, it will initiate the process of the connection and ask to authenticate the SSH key. Press Yes and press Use default config. You will get the graphical connection with the Ubuntu Server.
Remote Connection with Windows machine
Step 1: To connect with Windows 7 machine first, install the X2Go client in windows machine which is available online in the form of exe file. After the installation, run the X2Go client and give the same details which were given to connect Ubuntu server like IP, Login etc.
step-2
Step2: Put the credentials as user=administrator and password=pcquest which might be different in your case. You will get the remote desktop.
step-3

Sunday, 21 June 2015

 3D PRINTING

3D printing or additive manufacturing is a process of making three dimensional solid objects from a digital file. The creation of a 3D printed object is achieved using additive processes. In an additive process an object is created by laying down successive layers of material until the entire object is created. Each of these layers can be seen as a thinly sliced horizontal cross-section of the eventual object.

How does 3D printing work?

It all starts with making a virtual design of the object you want to create. This virtual design is made in a CAD (Computer Aided Design) file using a 3D modeling program (for the creation of a totally new object) or with the use of a 3D scanner (to copy an existing object). A 3D scanner makes a 3D digital copy of an object.
3d scanners use different technologies to generate a 3d model such as time-of-flight, structured / modulated light, volumetric scanning and many more.
Recently, many IT companies like Microsoft and Google enabled their hardware to perform 3d scanning, a great example is Microsoft’s Kinect. This is a clear sign that future hand-held devices like smartphones will have integrated 3d scanners. Digitizing real objects into 3d models will become as easy as taking a picture. Prices of 3d scanners range from very expensive professional industrial devices to 30 USD DIY devices anyone can make at home.

Processes and technologies

Not all 3D printers use the same technology. There are several ways to print and all those available are additive, differing mainly in the way layers are build to create the final object.
Some methods use melting or softening material to produce the layers. Selective laser sintering (SLS) and fused deposition modeling (FDM) are the most common technologies using this way of printing. Another method of printing is when we talk about curing a photo-reactive resin with a UV laser or another similar power source one layer at a time. The most common technology using this method is called stereolithography (SLA).
To be more precise: since 2010, the American Society for Testing and Materials (ASTM) group “ASTM F42 – Additive Manufacturing”, developed a set of standards that classify the Additive Manufacturing processes into 7 categories  according to Standard Terminology for Additive Manufacturing Technologies. These seven processes are:
  1. Vat Photopolymerisation
  2. Material Jetting
  3. Binder Jetting
  4. Material Extrusion
  5. Powder Bed Fusion
  6. Sheet Lamination
  7. Directed Energy Deposition
Below you’ll find a short explanation of all of seven processes for 3d printing:

Vat Photopolymerisation
A 3D printer based on the Vat Photopolymerisation method has a container filled with photopolymer resin which is then hardened with UV light source.
Vat photopolymerisation

The most commonly used technology in this processes is Stereolithography (SLA). This technology employs a vat of liquid ultraviolet curable photopolymer resin and an ultraviolet laser to build the object’s layers one at a time. For each layer, the laser beam traces a cross-section of the part pattern on the surface of the liquid resin. Exposure to the ultraviolet laser light cures and solidifies the pattern traced on the resin and joins it to the layer below.
After the pattern has been traced, the SLA’s elevator platform descends by a distance equal to the thickness of a single layer, typically 0.05 mm to 0.15 mm (0.002″ to 0.006″). Then, a resin-filled blade sweeps across the cross section of the part, re-coating it with fresh material. On this new liquid surface, the subsequent layer pattern is traced, joining the previous layer. The complete three dimensional object is formed by this project. Stereolithography requires the use of supporting structures which serve to attach the part to the elevator platform and to hold the object because it floats in the basin filled with liquid  resin. These are removed manually after the object is finished.


Material Jetting
In this process, material is applied in droplets through a small diameter nozzle, similar to the way a common inkjet paper printer works, but it is applied layer-by-layer to a build platform making a 3D object and then hardened by UV light.
Material Jetting schematics. Image source: CustomPartNet


Binder Jetting
With binder jetting two materials are used: powder base material and a liquid binder. In the build chamber, powder is spread in equal layers and binder is applied through jet nozzles that “glue” the powder particles in the shape of a programmed 3D object. The finished object is “glued together” by binder remains in the container with the powder base material. After the print is finished, the remaining powder is cleaned off and used for 3D printing the next object. This technology was first developed at the Massachusetts Institute of Technology in 1993 and in 1995 Z Corporation obtained an exclusive license.


Material Extrusion
The most commonly used technology in this process is Fused deposition modeling (FDM)

The FDM technology works using a plastic filament or metal wire which is unwound from a coil and supplying material to an extrusion nozzle which can turn the flow on and off. The nozzle is heated to melt the material and can be moved in both horizontal and vertical directions by a numerically controlled mechanism, directly controlled by a computer-aided manufacturing (CAM) software package. The object is produced by extruding melted material to form layers as the material hardens immediately after extrusion from the nozzle. This technology is most widely used with two plastic filament material types: ABS (Acrylonitrile Butadiene Styrene) and PLA (Polylactic acid) but many other materials are available ranging in properties from wood filed, conductive, flexible etc.
FDM was invented by Scott Crump in the late 80’s. After patenting this technology he started the company Stratasys in 1988. The software that comes with this technology automatically generates support structures if required. The machine dispenses two materials, one for the model and one for a disposable support structure
.


Powder Bed Fusion
The most commonly used technology in this processes is Selective laser sintering (SLS)
Selective_laser_melting_system_schematic
SLS system schematic. Image source: Wikipedia from user Materialgeeza under Creative Commons Attribution-Share Alike 3.0 Unported license

This technology uses a high power laser to fuse small particles of plastic, metal, ceramic or glass powders into a mass that has the desired three dimensional shape. The laser selectively fuses the powdered material by scanning the cross-sections (or layers) generated by the 3D modeling program on the surface of a powder bed. After each cross-section is scanned, the powder bed is lowered by one layer thickness. Then a new layer of material is applied on top and the process is repeated until the object is completed.
All untouched powder remains as it is and becomes a support structure for the object. Therefore there is no need for any support structure which is an advantage over SLS and SLA. All unused powder can be used for the next print. SLS was developed and patented by Dr. Carl Deckard at the University of Texas in the mid-1980s, under sponsorship of DARPA.

Sheet Lamination
Sheet lamination involves material in sheets which is bound together with external force. Sheets can be metal, paper or a form of polymer. Metal sheets are welded together by ultrasonic welding in layers and then CNC milled into a proper shape. Paper sheets can be used also, but they are glued by adhesive glue and cut in shape by precise blades. A leading company in this field is Mcor Technologies.

Here is a video with a metal sheet 3D printer by Fabrisonic that uses additive manufacturing paired with CNC milling:
Directed Energy Deposition
This process is mostly used in the high-tech metal industry and in rapid manufacturing applications. The 3D printing apparatus is usually attached to a multi-axis robotic arm and consists of a nozzle that deposits metal powder or wire on a surface and an energy source (laser, electron beam or plasma arc) that melts it, forming a solid object.
Direct Energy Deposition

Monday, 15 June 2015

Backing Up Files from an Unbootable System


Whenever your Windows system does not boot or crashes then you do not have to pull out the hard drive or use any Linux Live CD to recover your data. You can use a Windows installer disk to quickly backup your files. What’s more you can use a Windows 7 disk to back up files from a Windows 8 system or vice versa.
Step1: Boot From a Windows Installer Disk
First, insert a Windows installer disk (or a USB drive with the Windows installer on it) onto your computer and restart your computer. If you are not able to boot, then you need to change the boot settings in your computer BIOS.
Step2: At startup select Repair Your Computer option which you will see at the bottom-left corner of the window, with both Windows 7 and Windows 8 installer disks.
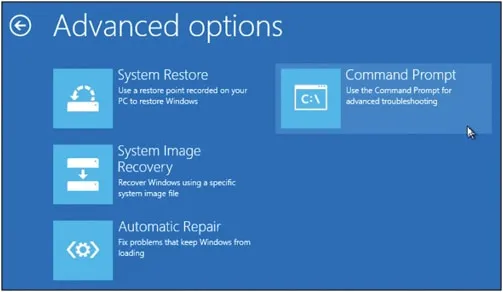
Step 3: If you are using a Windows 8 installer disk, select Troubleshoot > Advanced Options > Command Prompt.
Network-printer-in-Linux-(2)
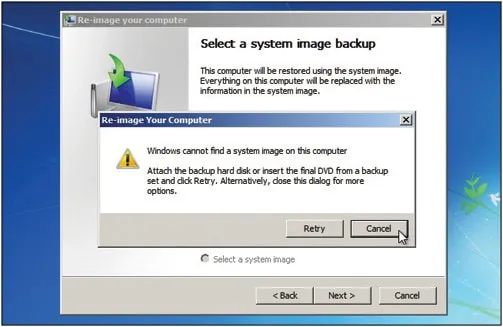
Step 4: If you are using a Windows 7 installer disk, select Restore your computer using a system image you created option and click on Next. When it unable to recover then it shows two option retry and cancle, press cancel

Network-printer-in-Linux-(3)
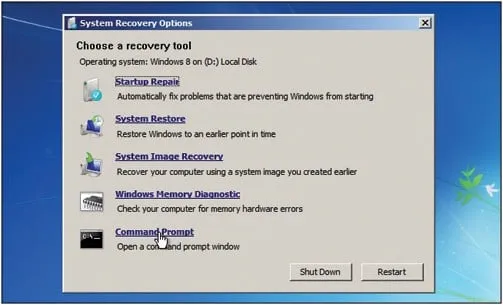
You will see the System Recovery Options window – click Command Prompt to launch a Command Prompt window.

Network-printer-in-Linux-(4)


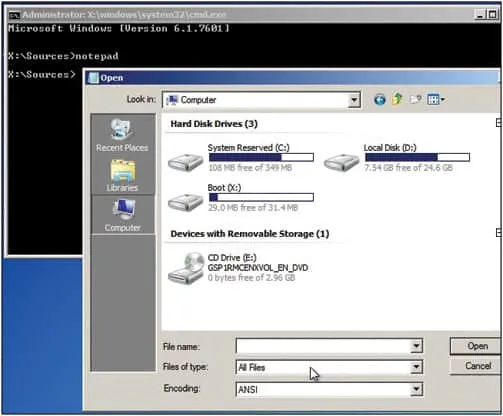
Step 5: When Command Prompt opens, type notepad and press Enter to launch a Notepad window. Click File and select Open in the Notepad window.
Step 6: Here, we want to open Windows Explorer. So, ensure you select the ALL Files option at the bottom of Windows and the click on My Computer. Then you will have all drives on your system including external drives and you will be able to copy paste your selected files on any drive.

Network-printer-in-Linux-(6)
Do not double-click any files as the Notepad will try to open them, and possibly freeze. If the Notepad freezes go back to command prompt and type taskmgr. This will launch Task Manager and kill the Notepad process and open it again from CMD. Once copying of files is done, shut down your computer and perform a clean install.