Wednesday 21 May 2014

How to Download and Use Google Maps for  Android, iOS Without Internet


What you need to use this feature

 
You're going to need an Android or iOS device. Unfortunately, this feature isn't available on other platforms. Google Maps version 3, which was released last week on iOS, added support for offline maps. Android users, be sure to update to Google Maps version 8 before following the steps listed below.
 
 How to save maps offline?
 
1. To use this feature, first sign in to your Google account to use this feature.
 
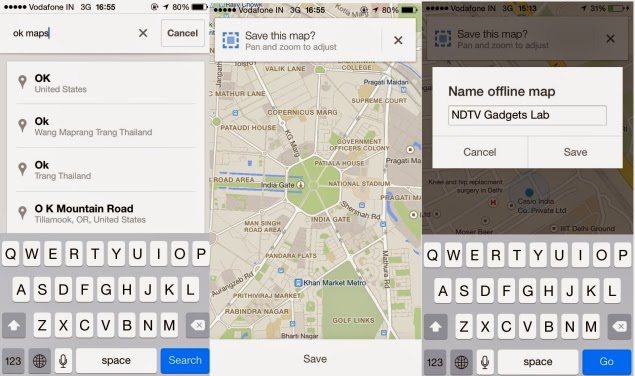
2. Type "OK Maps" in the search bar and hit the search button. A dialog at the top of the map asks "Save this map?" with a Save button at the bottom of the screen.
 
3. At this point, you can zoom in or out, and move the map, to select the area you want to save. Everything that is on-screen gets downloaded, so if you zoom out to save the entire Delhi area, for example, then you can later zoom in to see the individual localities and streets.

4. Once you've selected the area, tap the Save button at the bottom of the screen. A dialogue box pops up and you are asked to enter a name for the map. Just enter a name and tap on Save.
 
5. Accessing offline maps is easy. Just tap the 'person' icon, which is next to the directions icon on the search bar. This will take you to your profile. Scroll to the bottom to see your saved maps. You can rename saved maps in case you plan to save more than one.
 
There are certain limitations to saving offline maps. Zoom out too far and you will see an error saying that the map area can't be saved because it is too large. We were able to save almost all of Delhi, but Google Maps deemed the area "too large" when we tried to save National Capital Region (NCR).
There's nothing stopping you from saving multiple maps to cover a large area, in case you're worried about that. Another limitation is that map data is available only for 30 days. You'll have to download maps again after this.
The good thing is that the saved map of Delhi occupied just 9.9 MB of space on our phones. That's good news for those who are running low on storage space.

Friday 16 May 2014

How to troubleshoot problems with your Mac


Hardware troubleshooting
  1. Remove peripherals
    First unplug any peripherals you have, including printers, hard drives, extra displays, and scanners. Run your system with only the keyboard and mouse and with just one monitor attached, and see if this makes a difference. If so, then you can try swapping peripherals to different ports, or change the order in which they are attached to troubleshoot daisy-chaining.
  2. Update peripheral firmware and drivers
    Even if troubleshooting peripherals by unplugging or re-ordering them does not make a difference, still consider checking for and applying both firmware and drive software updates to the device. Check with your devices' manufacturers to see if there are firmware updates available, and install them. This is especially true if you have recently upgraded or updated your system software.
  3. Run Apple Hardware Tests
    Apple provides a test suite for all of its Mac systems, which will run a test on the RAM as well as check a number of different hardware sensors to ensure the system is running within voltage, amperage, and temperature tolerances. To access the tests, reboot your system with the D key held, or Option-D to load the tests form the Internet, and from there you can run and interpret the tests.
  4. Troubleshoot power sources
    Sometimes a system shutting down unexpectedly can be from faulty power adapters, so be sure you check the cabling and wall circuit you have yours attached to, and if troubleshooting the power adapter shows any problems, then consider replacing it.
  5. Test your Wi-Fi signal strength
    If your problem is with Internet connectivity and you are experiencing drop-outs, then you might be experiencing heavy noise or low signal in your Wi-Fi connection. Troubleshooting this will take time but can be done methodically by going to different locations and noting your connection's signal-to-noise ratio. By doing this, you can map out where noise may be coming from around your system, and adjust your environment accordingly.
  6. Reset the PRAM and SMC
    The only real hardware-based fixes you can do for your Mac, at least without opening it or getting it serviced, are to reset the Parameter RAM (PRAM) and system management controller (SMC). The PRAM can be reset by booting with the Option-Command-P-R keys held down, but resetting your SMC will require you to hold down a special combination of keys specific to your Mac's model.

Software troubleshooting

  1. Boot to Safe Mode
    If your Mac is having trouble with some third-party software, then you canboot into Safe Mode to see if doing so avoids the problem. Safe boot will load the system to a minimal boot environment, avoiding any nonessential software that potentially could be affecting the system. If the problem goes away in Safe Mode, then it is likely rooted in the main operating system as opposed to a configuration in your user account.
  2. New user account
    Try creating a new user account, or enable and log into the Guest account in the system. This will run all your system's same software, services, and installed programs under fresh user settings, and thereby help determine if the problem is account-based or rooted in the system. If the problem persists in your new or Guest user account, then this suggests it is system-wide and not an issue with your home folder. Therefore, performing steps like preference file deletion likely will not help.
  3. Remove application preferences
    If a specific application is giving you troubles and these problems are happening in just one account but not another, then you can try the classic approach to remove preferences for the program. Removing preferences can be done manually by going to the hidden Library > Preferences folder in your account and removing the associated .plist file for your program (found based on the developer name and program title, such as com.apple.TextEdit for Apple's TextEdit program), but can also be done using the OS X Terminal.
  4. Remove temporary and cache files
    Both OS X and applications running on it create temporary files and caches that, if corrupted, may lead to problems including hangs or the inability to perform specific tasks, and which can sometimes lead to crashes. If a specific program is causing problems, then you can try clearing the caches for it, or for the entire system, to see if this helps. While there are ways to do this manually, you can use the most up-to-date version of a reputablesystem maintenance tool like OnyX to access and remove cache files. Keep in mind these tools may be specific for a given version of OS X, but for the most part they will perform tasks like cache deletion just fine. After removing caches, restart your system to see if it's made a positive effect.
  5. Check Activity Monitor
    Open Activity Monitor and sort the various process lists by the %CPU, Memory, or Energy columns, to see if any program is regularly using up system resources. If one is persistently at the top of the list, then consider investigating it to see whether the activity seen is normal.
  6. Check filesystem formatting
    Use Disk Utility to both check the boot drive for errors, and to fix its permissions. To do this thoroughly, you will need to boot to the OS X Recovery partition and then use Disk Utility to verify and repair the hard drive. You can also run a permissions fix on the drive, to ensure system files are properly accessible. In addition to a full system permissions fix, you canreset the permissions on home folders in your user account, which will ensure programs, services, and anything else that runs under your account has proper access to the resources it needs.
  7. Check the system console
    The system console in OS X offers central access to system logs, and as such is a quick way to track down errors. While system and application logs can be somewhat cryptic, you can use some techniques to isolate messages and identify common errors that accompany the problematic behaviors you are experiencing. While console output can be difficult to interpret, if you see a repeating pattern then you can communicate this to technicians who might be better-equipped to help.
  8. Reinstall OS X
    While the idea of reinstalling an OS seems pretty invasive, Apple has made it almost seamless, where doing so will preserve your installed applications, settings, files, and other data you use. Performing a reinstall of OS X simply requires you boot into Recovery mode, and then select the option to reinstall OS X. This will simply replace all the core system files with fresh ones, which sometimes can be a quick fix for a damaged OS installation.
    Sometimes you can search for a "Combo" updater for your version of OS X from Apple's Support Downloads Web site, but while this will replace system files, it will do so only for the subset of those changed by the update. To ensure all files are replaced, perform a full reinstall followed by installing the relevant combo updater, or simply run Software Update in the Apple menu.

Friday 2 May 2014

ജിമെയില്‍ വഴി 10 ജിബി വരെ വലിപ്പമുള്ള ഫയലുകള്‍ എങ്ങനെ അറ്റാച്ച് ചെയ്ത്‌ അയക്കാം?


 ജിമെയില്‍ വഴി ഗൂഗിള്‍ ഡ്രൈവിന്റെ സഹായത്തോടെ 10 ജിബി വരെ വലിപ്പമുള്ള ഫയല്‍ അയക്കാനുള്ള ഒരു  വിദ്യ ഡെസ്ക്ടോപ്പ് വെബ്ബ് ബ്രൌസര്‍ വഴി മാത്രമേ സാധ്യമാവുകയുള്ളൂ.
1) ആദ്യംതന്നെ mail.google.com സന്ദര്‍ശിക്കുക.
Gmail send big file
2) നിങ്ങളുടെ ജിമെയില്‍ അക്കൗണ്ടിലേക്ക് ലോഗിന്‍ ചെയ്യുക.
Gmail send big file
3) പുതിയ ഒരു ഇമെയില്‍ അയക്കാന്‍ നിങ്ങളുടെ ഇന്‍ബോക്സിന്റെ ഇടത്ത് വശത്തുള്ള കമ്പോസ് (compose) ബട്ടണില്‍ ക്ലിക്ക് ചെയ്യുക.
Gmail send big file
4) കമ്പോസ് വിന്‍ഡോയുടെ താഴെ ഇടത് വശത്ത് കാണുന്ന “+” ഐക്കണിന്റെ മുകളില്‍ മൗസ് പോയന്റ്ര്‍ കൊണ്ട് വരുക.
Gmail send big file
5) ത്രികോണാകൃതിയിലുള്ള ഗൂഗിള്‍ ഡ്രൈവ് ബട്ടണില്‍ ക്ലിക്ക് ചെയ്യുക.
Gmail send big file
6) അപ്പോള്‍ തുറന്നുവരുന്ന വിന്‍ഡോയിലേക്ക് അറ്റാച്ച് ചെയ്ത് അയക്കേണ്ട ഫയല്‍ വലിച്ചിടുക അല്ലെങ്കില്‍ select files from your computer എന്ന ബട്ടണ്‍ ക്ലിക്ക് ചെയ്യുക.
Gmail send big file
7) select files from your computer എന്ന ബട്ടണില്‍ ആണ് നിങ്ങള്‍ ക്ലിക്ക് ചെയ്തത് എങ്കില്‍ അപ്പോള്‍ തുറന്നുവരുന്ന വിന്‍ഡോ വഴി നിങ്ങളുടെ ഹാര്‍ഡ്ഡ്രൈവില്‍ നിന്നും അറ്റാച്ച് ചെയ്യേണ്ട ഫയല്‍ തെരഞ്ഞെടുത്ത് ഓപ്പണ്‍ ബട്ടണ്‍ ക്ലിക്ക് ചെയ്യുക.
Gmail send big file
8) തുടര്‍ന്ന് അപ്‌ലോഡ്‌ ബട്ടണ്‍ ക്ലിക്ക് ചെയ്യുക. അങ്ങനെ നിങ്ങള്‍ക്ക് അയക്കേണ്ട ഫയല്‍ സുരക്ഷിതമായി ഗൂഗിള്‍ ഡ്രൈവിലേക്ക് സേവ് ആകും. സൈസ് കൂടിയ ഫയല്‍ ആണേല്‍ അപ്‌ലോഡ്‌ ആകാന്‍ നിങ്ങളുടെ ഇന്റര്‍നെറ്റ് സ്പീഡ് അനുസരിച്ചുള്ള സമയം എടുക്കും.
Gmail send big file
9) തുടര്‍ന്ന് to, subject, email body എന്നിവ ഫില്‍ ചെയ്യുക. എല്ലാം കഴിഞ്ഞാല്‍ send ബട്ടണ്‍ ക്ലിക്ക് ചെയ്യുക.
Gmail send big file
10) അടുത്തതായി നിങ്ങള്‍ അപ്‌ലോഡ്‌ ചെയ്ത ഫയലിന്റെ ഷെയറിങ്ങ് സെറ്റിങ്ങ്സ് മാറ്റുക. നിങ്ങള്‍ അപ്‌ലോഡ്‌ ചെയ്ത ഫയല്‍ ആര്‍ക്കെല്ലാം കാണാം എന്നുള്ളത് നിങ്ങള്‍ക്ക് ഇതുവഴി നിയന്ത്രിക്കാം.
Gmail send big file
11) തുടര്‍ന്ന് Share & send എന്ന ബട്ടണില്‍ ക്ലിക്ക് ചെയ്യുക.
Gmail send big file
12) അങ്ങനെ നിങ്ങള്‍ വളരെ വലിയ സൈസ് ഉള്ള ഫയല്‍ ജിമെയില്‍ വഴി അയച്ചു. നിങ്ങള്‍ ആര്‍ക്കാണോ അയച്ചത് അവര്‍ക്ക് ഇമെയിലില്‍ നിങ്ങള്‍ അപ്‌ലോഡ്‌ ചെയ്ത ഫയലിലേക്കുള്ള ലിങ്ക് കാണാം.
Gmail send big file

നിങ്ങള്‍ തീര്‍ച്ചയായും അറിഞ്ഞിരിക്കേണ്ട 10 ഗൂഗിള്‍ ലിങ്കുകള്‍


ഗൂഗിള്‍ ഉപഭോക്താക്കള്‍ തീര്‍ച്ചയായും അറിഞ്ഞിരിക്കേണ്ട 10 ഗൂഗിള്‍ ലിങ്കുകള്‍ പരിചയപ്പെടുത്തുന്നു. ഒരു സാധാരണ യൂസറിന് ഈ ലിങ്കുകള്‍ അത്ര പെട്ടന്ന് കണ്ടെത്താന്‍ കഴിയില്ല.
Important Google URLs
നിങ്ങള്‍ സന്ദര്‍ശിക്കുന്ന വെബ്സൈറ്റുകള്‍, നിങ്ങളുടെ ഗൂഗിള്‍ പ്ലസ് പേജ് തുടങ്ങിയവയുടെ അടിസ്ഥാനത്തില്‍ ഗൂഗിള്‍ നിങ്ങളുടെ ഒരു പ്രൊഫൈല്‍ നിര്‍മ്മിക്കുന്നു. നിങ്ങളുടെ വയസ്സ്, ലിംഗം, താല്‍പ്പര്യങ്ങള്‍ തുടങ്ങിയവയാണ് ഈ പ്രൊഫൈലില്‍ ഉണ്ടാവുക. ഇതിന്റെ അടിസ്ഥാനത്തില്‍ നിങ്ങള്‍ക്ക് ഏറ്റവും അനുയോജ്യമായ പരസ്യം ഗൂഗിള്‍ കാണിക്കുന്നു. മുകളില്‍പ്പറഞ്ഞ ലിങ്ക് സന്ദര്‍ശിച്ചാല്‍ വെബ്ബില്‍ ഗൂഗിള്‍ നിങ്ങളെ എങ്ങനെ കാണുന്നു എന്ന് മനസിലാക്കാം.
ജിമെയില്‍, ഗൂഗിള്‍ ഡ്രൈവ്, ഗൂഗിള്‍ കലണ്ടര്‍, യുട്യൂബ്, ഗൂഗിള്‍ ബുക്ക്‌മാര്‍ക്സ്‌ തുടങ്ങി ഗൂഗിളിന്റെ 15ല്‍ കൂടുതല്‍ സേവനങ്ങളിലുള്ള നിങ്ങളുടെ വിവരങ്ങള്‍ കംപ്രസ്സ് ചെയ്ത് ഡൗണ്‍ലോഡ് ചെയ്യാന്‍ മുകളില്‍ കൊടുത്ത takeout ലിങ്ക് സന്ദര്‍ശിച്ചാല്‍ മതി.
നിങ്ങളുടെ അറിവോടെയല്ലാതെ നിങ്ങളുടെ വിവരങ്ങളോ മറ്റോ ഗൂഗിളിന്റെ ഏതെങ്കിലും സേവനങ്ങളില്‍ ഉണ്ടെങ്കില്‍ അത് നീക്കം ചെയ്യാനുള്ള പരാതി മുകളില്‍പ്പറഞ്ഞ ലിങ്ക് വഴി നല്‍കാം.
നിങ്ങളുടെ ആന്‍ഡ്രോയ്ഡ് ഫോണില്‍ ലൊക്കേഷന്‍ ട്രാക്ക് ചെയ്യുന്നത് ഓണ്‍ ആണെങ്കില്‍ നിങ്ങള്‍ എവിടെയൊക്കെ ആയിരുന്നു എന്ന് ഗൂഗിള്‍ സെര്‍വറില്‍ സേവ് ആകുന്നുണ്ടാകും. മുകളില്‍പ്പറഞ്ഞ ഗൂഗിള്‍ മാപ്പ് വെബ്സൈറ്റ് സന്ദര്‍ശിച്ചാല്‍ നിങ്ങളുടെ ലൊക്കേഷന്‍ ഹിസ്റ്ററി ലഭിക്കും. അതൊരു KML ഫയല്‍ ആയി ഡൗണ്‍ലോഡ് ചെയ്യാനുള്ള സൗകര്യവുമുണ്ട്.
ഈ ലിങ്ക് സന്ദര്‍ശിച്ചാല്‍ നിങ്ങളുടെ ഗൂഗിള്‍ സെര്‍ച്ച്‌ ഹിസ്റ്ററി കാണാം. ഗൂഗിള്‍ അക്കൗണ്ടില്‍ ലോഗിന്‍ ചെയ്ത് നിങ്ങള്‍ നടത്തുന്ന സെര്‍ച്ചുകളെ കുറിച്ചുള്ള വിവരങ്ങള്‍ മാത്രമേ ലഭിക്കൂ.
ജിമെയില്‍ അക്കൗണ്ടില്‍ തുടര്‍ച്ചയായി 9 മാസം വരെ ലോഗിന്‍ ചെയ്യാതെയിരുന്നാല്‍ ഗൂഗിളിന്റെ പ്രോഗ്രാം പോളിസി പ്രകാരം അവര്‍ നിങ്ങളുടെ ജിമെയില്‍ അക്കൗണ്ട്‌ ഡിലീറ്റ് ചെയ്യും. ഒന്നില്‍ കൂടുതല്‍ ജിമെയില്‍ അക്കൗണ്ട്‌ ഉള്ളവര്‍ക്ക് ചിലപ്പോള്‍ ഇതൊരു പ്രശനമാകും. മുകളില്‍പ്പറഞ്ഞ ലിങ്കില്‍ പോയി നിങ്ങള്‍ക്ക് നിങ്ങളുടെ പ്രധാന അക്കൗണ്ട്‌ സെറ്റ് ചെയ്യാം. തുടര്‍ന്ന് മറ്റ് അക്കൗണ്ടുകളും. ഇങ്ങനെ ചെയ്താല്‍ നിങ്ങളുടെ മറ്റ് ഇമെയില്‍ അക്കൗണ്ടുകളില്‍ ലോഗിന്‍ ചെയ്തിലെങ്കില്‍ ഓരോ മാസവും ഗൂഗിള്‍ അത് ഓര്‍മ്മിപ്പിച്ചുകൊണ്ടുള്ള അലേര്‍ട്ട് മെയിലുകള്‍ അയക്കും.
ഈ ലിങ്ക് സന്ദര്‍ശിച്ചാല്‍ ഏതൊക്കെ ഉപകരണങ്ങളില്‍ ആണ് നിങ്ങള്‍ ഗൂഗിള്‍ അക്കൗണ്ടിലേക്ക് ലോഗിന്‍ ചെയ്തത്, എപ്പോഴൊക്കെ ലോഗിന്‍ ചെയ്തു, അക്കൗണ്ട്‌ സെറ്റിങ്ങ്സില്‍ എന്തൊക്കെ മാറ്റങ്ങള്‍ വരുത്തി തുടങ്ങിയ കാര്യങ്ങള്‍ അറിയാന്‍ സാധിക്കും.
നിങ്ങളുടെ ഗൂഗിള്‍ അക്കൗണ്ടിലെ വിവരങ്ങള്‍ ഉപയോഗിക്കാന്‍ അനുവാദം നല്‍കിയ ആപ്പുകളുടെയും, ബ്രൌസര്‍ എക്സ്റ്റന്‍ഷനുകളുടെയും മുഴുവന്‍ ലിസ്റ്റ് ഈ ലിങ്ക് സന്ദര്‍ശിച്ചാല്‍ ലഭിക്കും.
ഗൂഗിള്‍ ആപ്പ്സ് ഉപഭോക്താക്കള്‍ക്ക് ഏറ്റവും ഉപകാരപ്രദമായ ലിങ്ക് ആണിത്. നിങ്ങളുടെ ഗൂഗിള്‍ ആപ്പ്സ് അക്കൗണ്ടിന്റെ അഡ്മിന്‍ അക്കൗണ്ട്‌ ഹാക്ക് ചെയ്യപെട്ടാല്‍ മുകളില്‍പ്പറഞ്ഞ രഹസ്യ ലിങ്ക് വഴി പാസ്സ്‌വേര്‍ഡ്‌ മാറ്റം.
ഈ ലിങ്ക് വഴി ജിമെയില്‍ അക്കൗണ്ട്‌ ഇല്ലാതെ നിങ്ങള്‍ക്ക് ഗൂഗിള്‍ അക്കൗണ്ട്‌ ഉണ്ടാക്കാം. യൂസര്‍ നെയിം നിങ്ങള്‍ നല്‍കുന്ന ഇമെയില്‍ ഐഡി ആയിരിക്കും.

Thursday 1 May 2014

MOZILLA FIREFOX 29

                     Mozilla has unveiled the latest version of its Firefox internet browser, with an emphasis on customisation and cross-device syncing.
Jonathan Nightingale, VP of Firefox at Mozilla, said Firefox 29 – which is available to download now - is the "biggest update in a while" for the nearly decade old browser, featuring its newAustralis user interface.
The design is closer to Chrome than previously; redesign of the browser tabs makes means that tabs not in use fade into the background so they are less of a distraction (the downside is it also makes them harder to see). And a new Firefox menu in the right-hand corner puts all the most used functionality – such as new window, print, history and find, all in one place.  The menu includes a "customise" tool that allows users to add or move any feature or browser add-on, while bookmarks can be created with a single click. Firefox retains its seperate search box however.
The Firefox Sync service, which is powered by Firefox accounts, allows user to keep the same browser set up on different devices, sharing browsing history, saved passwords, bookmarks, open tabs and form data across PCs and mobile Android devices